April's Top Winner will receive
A FABULOUS PRIZE PACKAGE
offered by our hostess, Katy!!!
Here's what you could win~

Each stamper who's card is showcased
will receive 1 digital
sentiment made by yours truly! ;)
Here's the digi sentiment you could win~
PLEASE MAKE SURE THAT YOUR CREATION USES OUR TUTORIAL OR YOUR ENTRY WILL BE DELETED. If you need to review the rules, please consult the tab up top! Now let's get started!
***************************************
Water Stamping Technique
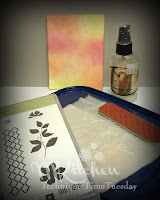
Materials Needed
 |
| Not all materials used to complete card pictured. |
*White cardstock
*Blending tool or sponges
*Desired inks
*Bold background or solid image stamps
*Paper towel
*Water
*Plate/lid/anything to keep your water pad on
***************************************
"How To"
1. Ink up your paper using either a sponge or blending tool. I just recently purchased a blending tool and I can tell you that it is definitely a fabulous investment! Make sure to start with the lightest color first and then work your way up to the darkest.
2. Create your water ink pad by placing your paper towel into some sort of container and adding water. Get it soaked, but not dripping. You don't want water splashing when you wet your stamp, but there needs to be quite a bit of water for this to work. Stamp your image onto the colored panel. The image will become more defined as the water dries.
3. If you want to try a little variation, add some glimmer mist into your water and stamp with that, too. It creates a really nice shine!
4. You've got your completed panel.
5. Add it to your project.
 |
| More info on my personal blog HERE. |


7 comments:
Oooh, thus looks interesting. Hopefully I'll get to play along again x
This looks gorgeous. I'll try it ASAP. Pictures follow :-)
Taking inspiration from fab DT cards made a card based on this technique and linked it.Hope it qualifies.
Thanks so much for sharing this technique. I did not know of it yet and realy like the look that you get.
Really enjoyed this challenge - again! Lovely inspiration from the DT.
Is it too late to collect my digis for last months win? I have been without internet for a while (posted on my blog) and I'm still trying to catch up - I will fully understand if it's too late.
Julia
I clicked on your rose for this month's challenge Mynnette, and didn't notice that the collection had closed... but I was really grateful to see the technique. If you'd like to see the card I made you can see it here #
Chrissie
I followed the link on the rose for this month;s challenge and didn't notice that the colledtion had closed... however, I really enjoyed trying the technique.
YOu can see my card here
Chrissie
Post a Comment